Author: David Saunders

  • Thesis Theme for WordPress

    coffee_cupIt’s good to change things up once in a while. And despite my earlier post about “thinking again” before changing WordPress themes, (see this post: Changing WordPress Themes? Think Again! ), I took the plunge and paid for the Developer’s option for the Thesis Theme from DIYthemes.com.

    Why did I pay for a theme, when there are so many nice “free” themes? Well, to my way of thinking, “free” often comes with a price. And sometimes, “free” doesn’t come with the niceties great features that a well thought-out theme includes.

    Some of the features that intrigued me are:

    • Great SEO built right into the theme
    • Ease of design changes
    • Hooks into the theme and into WordPress itself
    • Minimal effort to create a great-looking blog site
    • Ease of changing the look in the future

    I plan to spend more time on the design of this site, but for now, I can enjoy the clean lines of Thesis, while I ponder ways to customize the columns and overall look of the site.

    I hope you enjoy the new look, as I will enjoy experimenting with design enhancements.

  • FreeBSD-Postfix-Dovecot-MySQL-Virtual Domains

    I used this HOWTO to build a mail server (I did it within a FreeBSD jail, but that’s a completely different discussion). The instructions are complete and I got the server working relatively easily.

    I would suggest that before you start the HOWTO, that you install the following on your mail server first:

    • FreeBSD Ports
    • OpenSSL
    • OpenSSH
    • NTP

    The PORTS system makes installation a breeze. OpenSSL is necessary if you want to send your passwords over an SSL connection to your web server (I highly recommend this). OpenSSH comes with a few client utilities that are worth having on your system (like the ability to create an encrypted password). NTP will keep your system clock up to date.

    I had two problems with the setup (which were of my own making):

    1. Although I used the cut-and-paste method for much of the configuration, I was somehow still able to inject a few typo’s into the configuration files. Yeah… try to chase those down. Not fun.
    2. Somewhat related, I attempted to tell my Mail application that the host server was the virtual domain name. Again, this falls under the category of typographical error. (I told Mail to look for the mail at: mailhost.virtualdomain.tld rather than mailhost.myrealserver.tld. It took me a few hours to figure this one out. Ouch).

    So my thanks go out to the PurpleHat Organization for a clear HOWTO for creating a mail server on FreeBSD with Postfix, Dovecot, MySQL, SpamAssassin, etc. with Virtual Domains administered with PostfixAdmin.

  • Using GarageBand to Transpose a Song Imported from iTunes

    STOP!!! If you are using a new version of GarageBand, see my other posts, depending on which version you have!

    Newest ====> El Capitan users, click here for the latest! (GB v.10.1.0) <====

     Yosemite users, click here for the latest! (GB v.10.0.3)

    Use GarageBand to Transpose a Song Imported from iTunes iLife ’11

    Do you need to transpose the pitch of a song in your iTunes library? Then this post is for you! Be forewarned, though. You can make the song sound really bad by doing this, but if you stay within one or two half-steps (one or two clicks of the slider in GarageBand), you can get a song into a more playable (or singable) key.

    If you recorded the song yourself, with your own “real instrument” or with a microphone, then GarageBand will transpose the key without any special intervention. The track will be purple in color, and you can just edit the track. But if the track is orange, you need to follow the steps below to transpose the song.

    Another note: If you have upgraded to iLife ’11, you could also see the comments beginning with the one dated November 9, 2010. Many people corrected the instructions as GarageBand was updated. Thank you all! The comments are still here for you to view: Click Here to go directly to that first comment for iLife ’11.

    First, create a new song in GarageBand

    Open GarageBand and create a new song. Command-N will create a new song, too.

    Next, drag the song you want to transpose from iTunes into GarageBand

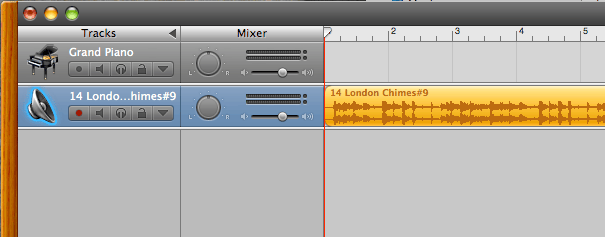
    When you drop the song into GarageBand, it will create a track and color it orange. This means that it is an imported song. (In GarageBand a recorded song is purple).

    Next, click in the track region to see the audio graph.

    Here’s the trick! Press control-option-G and click the track again.

    This trick is not documented in the help file for GarageBand, but it is a great tip for changing an imported track from orange to purple, making it available for more editing options.

    Now we Edit the Track

    Press the Show Editor button (or press Command-E).

    The Show Editor button is highlighted in blue above.

    Here’s how the Editor looks at this point:

    Now, click the box for “Follow Tempo & Pitch”

    Slide to Your Heart’s Content

    But don’t get crazy. You can make the song sound pretty bad. If you want crazy vibrato or if you don’t mind the change in tempo, by all means, move the slider all the way to -12 or +12. A more reasonable amount might be (+ or -) 2.

    There you have it. Your song has been transposed for you. It’s really amazing.

    Press Play and Listen to your Transposed Song

    That’s It, Take Care!

    That’s all there is to it. Of course, this should be used with great care. The tempo and pitch are both changed. This might just be the gig-saving trick to get everybody playing in a new key. Let me know how you used this trick. Best wishes!

     republican-coffee-1


  • Keeping MacBook and iMac in Sync

    I have been using Mac computers for a few years now. Prior to that, I carried around a Sony VAIO laptop, which was my main computer for business and personal productivity tasks. I had three offices plus my home office. I am now down to two offices and a home office. I never needed to sync anything (except for my PDAs and phones): I kept everything on my laptop computer and just made sure that I had a good backup (which DID come in handy on more than one occasion).

    Although I still have several Windows machines around that get occasional use, I have moved all of my day-to-day business and personal computing to Apple Macs. I have an iMac (the beautiful aluminum one), a MacBook Air, and an iPhone. On my home network, there is also a Mac Mini that serves as my fax receiver, backup server and primary iTunes server for my AppleTV.

    I really like the MacBook Air. It is a great travel companion. There is plenty of room for my Word documents, my spreadsheets, my InfoSelect data, e-mails and other daily-use files. I don’t carry around all of my photos, videos, music and other large-file media. I don’t need to: I can get to them any time I want with a variety of techniques.

    Keeping Calendars and Contacts in Sync

    My Macs are always in sync with Apple’s MobileMe service. While there are certainly lots of ways of accomplishing the same thing, for ease of use MobileMe can’t be beat.

    With MobileMe, I keep the following items in sync between all my computers and my iPhone:


    • Bookmarks
    • Calendars
    • Contacts
    • Mail Accounts
    • Mail Rules, Signatures, and Smart Mailboxes
    • Notes


    So, no matter which of my computers I am on (including my iPhone), Safari looks the same. All of my bookmarks are the there, my contacts are with me, and my calendar is up to date. If I make a change on my iPhone, the data on my computers us up to date within an hour (based on my sync preferences).

    Keeping Files Synchronized

    The beauty of having a desktop computer is having greater resources at your disposal: plenty of file space, a large video monitor, blazing speed, etc. The beauty of a MacBook Air is having a subset of the above in a streamlined aluminum body, smaller than a manilla envelope.

    So, in order to keep all my Word files, spreadsheets (and even my archives of these files) synchronized between them, I have a daily routine that includes ChronoSync by Econ Technologies, Inc.

    In order to keep my MacBook Air from getting bloated with stuff from my desktop machine, I keep a folder in my home directory called My_Stuff. These files get synced while leaving many of the large media files on the desktop alone.

    Over my home network (a combination of wired and wireless access) the entire process usually takes just over a half minute to complete. So every morning and every night I just get ChronoSync to do its thing and I never worry about it again.

    There are other tricks to keeping in sync. But for me, this is a simple solution that gives me the freedom to go from office to office with all my files.

    Need a File That Is Not Synced?

    What about those media files, or any other files that you do not regularly keep synchronized on your laptop computer? Well, I use MobileMe’s “Back to My Mac” feature. I can log on to my home iMac and either copy the file to my laptop, or just use the file on the desktop without ever transferring it.

    For example, I keep DreamWeaver on my iMac at home. I do not use it on my laptop, because my need for updating websites (other than my blog) while I travel is relatively rare. On those occasions, I bring up my screen at home, start DreamWeaver, edit my site and send the file to the server via FTP. The file never actually exists on my laptop. The entire thing is done remotely without the need for cluttering up my laptop with occasional-use software.

    In Summary

    There you have it. My simple plan for keeping my Macs in sync with each other. You might have a better plan. Great! Feel free to share it with us.

  • One Starbucks Visit Leads to Leadership Reminders

    In just one 5-minute stop, Marla and I observed leadership in action while we sipped on hot coffee. Leadership comes naturally to Jeremy at Starbucks in the Gardens Mall (Palm Beach Gardens, Florida). Nothing very complicated happened, but that one trip reminded us of the importance of the small things we do that make a huge difference in the overall outcome of our endeavors.

    At Coffee Shop Journal, Marla has committed our experience to her journal. It is a quick read, full of takeaways for your business.

    Coffee Shop Journal:

    You don’t want to miss it. Just five quick points to ponder!